
YoungPost Club Learn
DOWNLOAD OUR APP
appstoregoogleplay
FIND US AT
My JourneyMy VocabularyMy Leaderboard
My AccountSearchAbout UsContact Us
Subscription Plan
School Subscription
YOUNG POST
NewsTrendingBeing wellLearning zoneShare with usQuizzes
SPARK
NewsTrendingBeing wellLearning zoneShare with usQuizzes
POSTIES
Big readEye on the newsHa-ha-happeningsThings to doYour saySteam studioHealth and happinessQuizzes
Subscribe to Young Post Club to access our great content
ABOUT US|CONTACT US|WRITE FOR US|PRIVACY POLICY|TERMS & CONDITIONS
©2025 Young Post Club. All rights reserved.
My Journey Hello
Brand Avatar
Young Post
My Journey illustration

With a subscription, you can answer quizzes and track your reading progress.

Read / STEAM studio

Science activity: how to make your own lung model with balloon

bySCMP
Published: 3:33am, 03 Aug 2022
Length: 359 words
Science activity: how to make your own lung model with balloon

Photo: Handout

Let's learn how to make a working lung!

You will need:

  • 2 balloons
  • Empty bottle and cap
  • Straw

  • Scissors

  • Box cutter

  • Screwdriver

  • Blu-tack

  • Tape

  • An adult to help

    Photo: Handout

Directions:

Step 1: Using a cutter, ask an adult to help you cut off the bottom of the bottle.

Photo: Handout
Photo: Handout
Step 2: Take one of your balloons, and tie the end in a knot.
Photo: Handout
Step 3: Use scissors to cut off the other end (not the tied end) of the balloon.
Photo: Handout
Step 4: Stretch the end of the balloon over the bottom of the bottle, and fix it there with tape.
Photo: Handout
Photo: Handout
Step 5: Ask an adult to help you drill a hole in the centre of the bottle with a screwdriver.
Photo: Handout
Photo: Handout
Step 6: Cut off the lip of the second balloon.
Photo: Handout
Step 7: Push the straw into the end of the untied balloon, fix it with tape, then push the straw through the bottom of the cap.
Photo: Handout
Step 8: Put the balloon-covered end of the straw into the bottle, and screw on the cap.
Photo: Handout
Step 9: Use some blu-tack to make a seal around the straw.
Photo: Handout
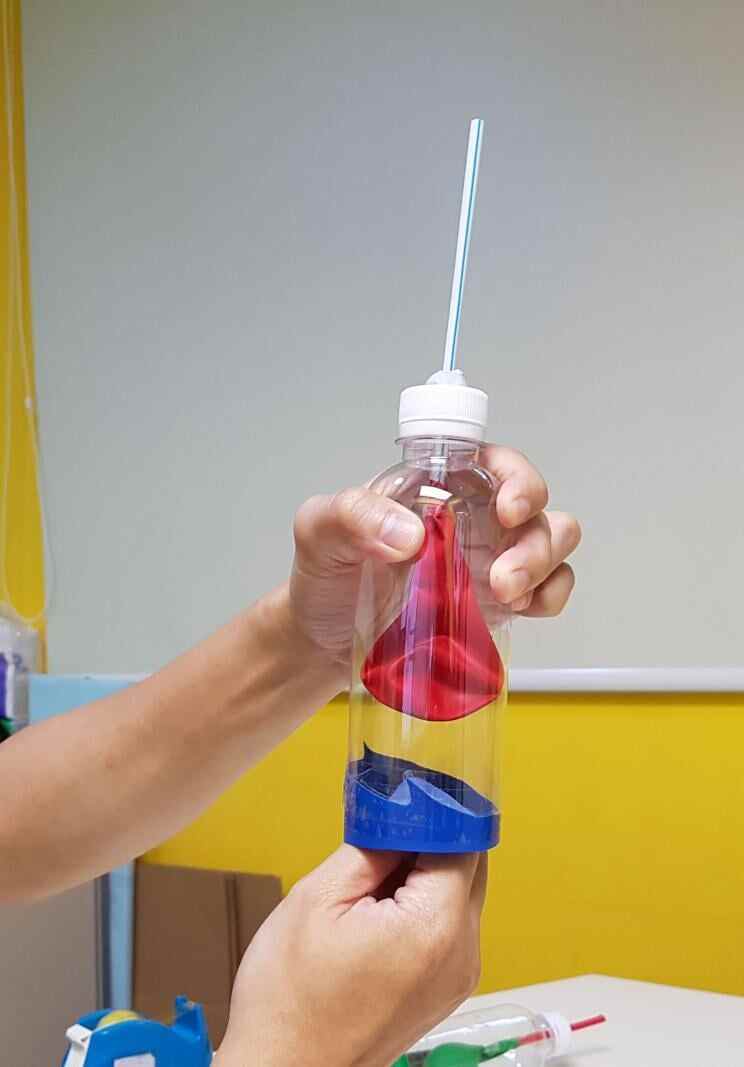
Step 10: Pull on the end of the balloon that is wrapped around the bottom of the bottle. The balloon inflates. When you push the bottom balloon up, the balloon inside deflates!

Photo: Handout

How it works

When the bottle is sealed by the balloon on one end, and the cap, straw and balloon at the other end, it is nearly airtight. This means air cannot go in or out.

When you pull the balloon, the volume of the container increases. However, the volume of air inside the container stays the same. This makes an area of low air pressure inside the bottle, while the air pressure outside the bottle stays the same. The higher air pressure from outside the bottle forces itself into the straw. Outside air rushes in to fill the straw and the balloon until the air pressure has balanced out.

Releasing the balloon brings the container back to its original air pressure, and the balloon deflates as air goes out of the straw.
KEEP READING
cover
Things to do
Science activity: here is how you make a cloud in a jar
22 Jun 2022